로그인 폼 만들기
2주차 실습과제
- Form handling width state
- State Handling with useEffect
- State handling with Redux
- component Handling with state
간단하게 매니저님이 서버를 만들어 주시고 id와 pw를 맞게 입력하면 로그인, 틀릴경우에 에러코드에 맞게 메세지를 출력하는 실습
로그인 컴포넌트

input으로 id와 password를 받아 각각 setId와 setPassword로 저장
저장된 id와 password를 body에 넣어주고,
axios post요청 할 때 url 주소와 body를 같이 넘겨 주면 된다.
그리고 loading의 boolean 값으로 로그인버튼의 disable을 조절 해 줄 예정 이므로
로그인 버튼이 눌리면 setLoading으로 값을 true로 변경 시켜 준다
1
2
3
4
5
6
7
8
9
10
11
12
13
14
15
16
17
18
19
20
21
22
23
24
25
26
27
28
29
30
31
32
33
34
35
36
37
38
39
40
41
42
43
44
45
46
47
48
49
50
51
52
53
54
55
56
57
58
59
60
61
62
63
64
65
66
67
68
69
70
71
72
73
74
75
76
77
78
79
80
81
82
83
84
85
86
87
88
89
90
| import React, { useState, useEffect, useRef } from 'react';
import { useDispatch } from 'react-redux';
import { loginUser } from '../reducer/userSlice.js';
import axios from 'axios';
function LoginComponent() {
const dispatch = useDispatch();
const [id, setId] = useState('');
const [password, setPassword] = useState('');
const [loading, setLoading] = useState(false);
const [msg, setMsg] = useState('');
const idInput = useRef(null);
const pwInput = useRef(null);
const body = {
id,
password,
};
useEffect(() => {
const timeout = setTimeout(() => {
setMsg('');
}, 1500);
return () => {
clearTimeout(timeout);
};
}, [msg]);
const getUsers = async () => {
};
const LoginFunc = (e) => {
e.preventDefault();
setLoading(true)
getUsers();
};
const handleError = (response) => {
};
const handleChangeID = (e) => {
setId(e.target.value);
};
const handleChangePW = (e) => {
setPassword(e.target.value);
};
return (
<>
<h1>LoginComponent</h1>
<form onSubmit={LoginFunc}>
<label htmlFor='id'>ID : </label>
<input
type='text'
ref={idInput}
value={id}
id='id'
onChange={handleChangeID}
/>
<br />
<label htmlFor='password'>Password : </label>
<input
type='password'
id='password'
ref={pwInput}
value={password}
onChange={handleChangePW}
/>
<br />
<br />
<button disabled={loading} type='submit'>
로그인
</button>
<br />
</form>
<br />
{msg}
<br />
</>
);
}
export default LoginComponent;
|
axios 요청
1
2
3
4
5
6
7
8
9
10
11
12
13
14
15
16
17
|
const getUsers = async () => {
try {
const response = await axios
.post('https://st-fe34.herokuapp.com/api/login', body)
.then((res) => res.data)
.catch((error) => {
setMsg(error.message);
});
handleError(response);
setLoading(false);
} catch (err) {
console.log(err);
} finally {
setLoading(false);
}
};
|
post 요청시에는 body에 정보를 담아서 보내고
get 요청시에는 ?id= 같은 주소에 파라미터에 포함시켜 보낸다
둘의 차이점에 대해서 좀 더 자세히 공부 해볼것..
어쨋든 요청을 보내고 나면
body 값에 따라 다른 코드를 받게된다
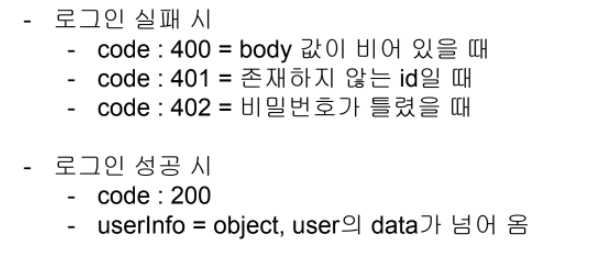
받은 code에 따라 메세지를 출력 해주는 메소드를 작성 한다
조건이 몇개 되지 않아 else if 로 작성 해도 되지만 switch로 작성 해보았다.
그리고 마지막에 정상코드일시 dispatch를 통해 userInfo를 담아 store의 loginUser action을 호출 한다
1
2
3
4
5
6
7
8
9
10
11
12
13
14
15
16
17
| const handleError = (response) => {
switch (response.code) {
case 400:
setMsg('ID와 PW를 입력해주세요');
break;
case 401:
setMsg('존재하지 않는 ID 입니다');
idInput.current.focus();
break;
case 402:
setMsg('비밀번호가 틀렸습니다');
pwInput.current.focus();
break;
default:
dispatch(loginUser(response.userInfo));
}
};
|
store의 userSlice
컴포넌트에서 dispatch로 loginUser액션을 호출하면서 넘긴 값은 payload에 담겨서 온다
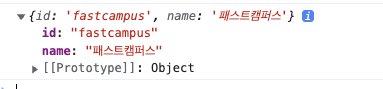
받아온 값을
store의 state값으로 저장 해주면 된다
그리고 로그아웃 버튼을 누르면 clearUser 액션을 호출하게 되고
clearUser액션을 통해 스토어의 값들을 비워 주면 된다.
1
2
3
4
5
6
7
8
9
10
11
12
13
14
15
16
17
18
19
20
21
22
23
24
25
26
27
28
29
30
| import { createSlice } from '@reduxjs/toolkit';
export const userSlice = createSlice({
name: 'user',
initialState: {
name: '',
id: '',
isLoading: false,
isLogin: null,
check: false,
},
reducers: {
loginUser: (state, { payload }) => {
state.name = payload.name;
state.id = payload.id;
state.isLoading = true;
state.isLogin = true;
},
clearUser: (state) => {
state.name = '';
state.id = '';
state.isLoading = false;
state.isLogin = false;
},
},
});
export const { loginUser, clearUser } = userSlice.actions;
export default userSlice.reducer;
|
mypage component
store에 있는 state를 불러올때는 useSelector 훅을 사용해야 한다
로그인했을때 store에 저장해둔 user의 name을 출력해준다
로그아웃 버튼을 눌렀을때는 clearUser 액션을 호출해준다
1
2
3
4
5
6
7
8
9
10
11
12
13
14
15
16
17
18
19
20
21
22
23
24
| import React from 'react';
import { useSelector, useDispatch } from 'react-redux';
import { clearUser } from '../reducer/userSlice.js';
function MyPage() {
const user = useSelector((state) => state.user);
const dispatch = useDispatch();
const LogoutFunc = () => {
dispatch(clearUser());
};
return (
<>
<h1>MyPage</h1>
<p>{user.name}님, 안녕하세요!</p>
<button onClick={LogoutFunc}>로그아웃</button>
</>
);
}
export default MyPage;
|
App.jsx
1
2
3
4
5
6
7
8
9
10
11
12
13
| import React from 'react';
import { useSelector } from 'react-redux';
import InputComponent from './component/InputComponent';
import MyPage from './component/MyPage';
function App() {
const user = useSelector((state) => state.user);
return <div>{user.isLogin ? <MyPage /> : <LoginComponent />}</div>;
}
export default App;
|
store에 있는 isLogin 값에 따라 로그인창이 보일건지 로그아웃창이 보일건지 설정