Redux
- 리액트는 컴포넌트 간의 depth가 깊어질 수록 props(state)를 주고 받는 일이 힘들어진다
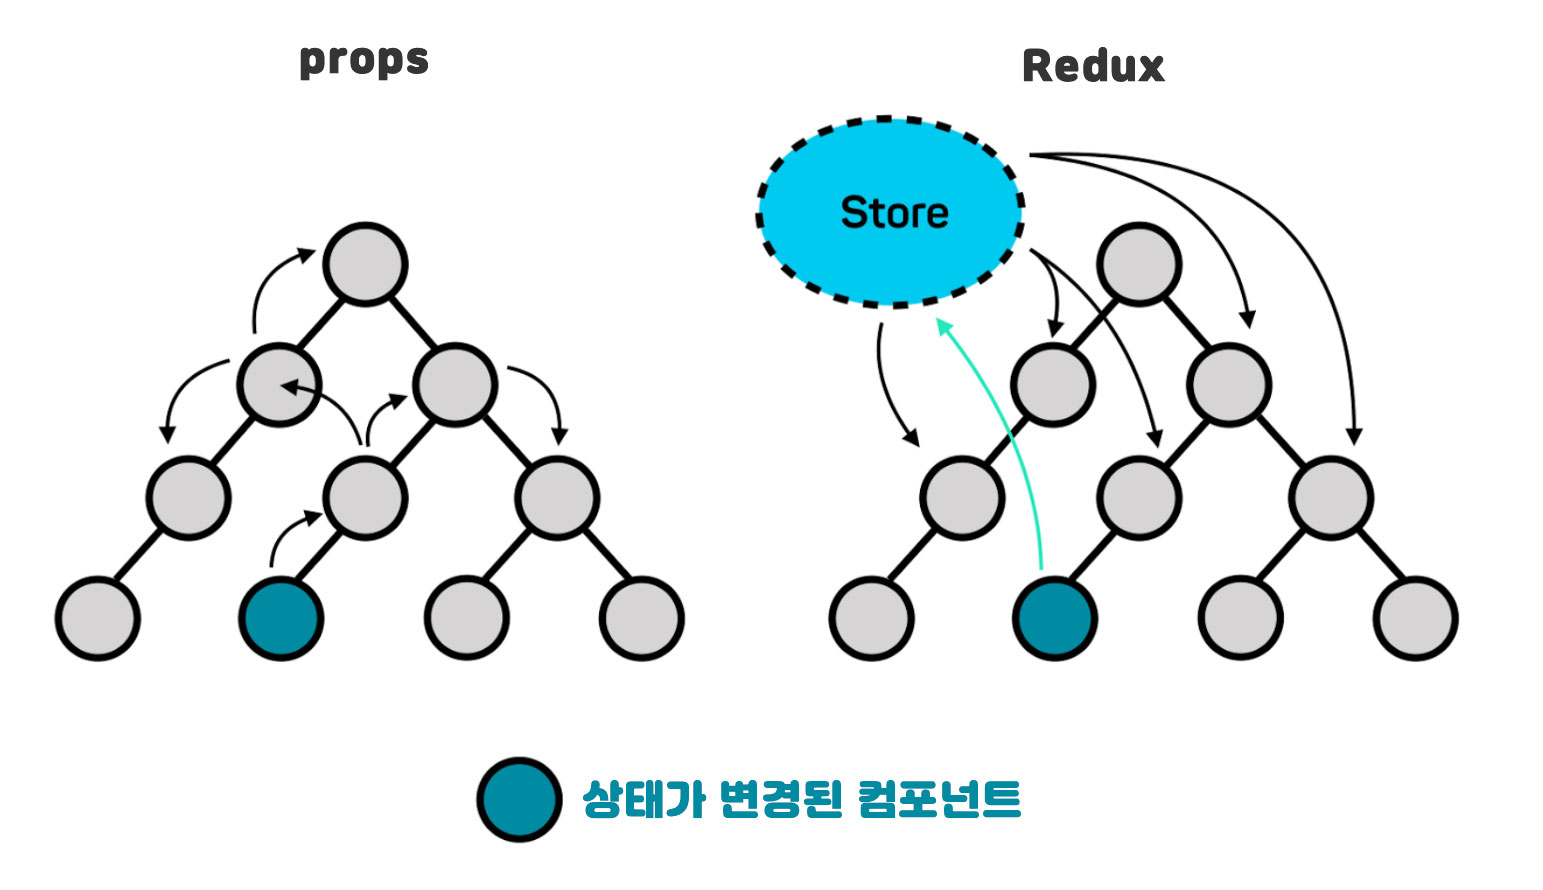
- 리덕스를 통해서 state를 한 곳에 몰아 저장할 수 있다
- 리덕스를 통해서 state를 어떤 컴포넌트에서든지 바로 사용 할 수 있다(부모간의 props전달이 필요 없다)
- 리덕스를 통해서만 state를 변형 할 수 있으므로 관리가 용이하다
Redux-toolkit
- 기존 리덕스는 사용하기가 복잡하다
- 리덕스에서 좀더 간편하게 사용할 수 있게 Redux-toolkit 이라는 라이브러리를 지원한다
1 | $ npm i @reduxjs/toolkit |
store
- 애플리케이션의 state를 관리하고 업데이트하는 중앙 저장소 역할을 한다
- toolkit 에서는 slice들을 모아 관리 한다
- configureStore 로 store 를 설정해 줄 수 있다
1 | import { configureStore } from '@reduxjs/toolkit'; |
- 어떤 컴포넌트던지 리덕스의 store에 접근해 state를 사용 할 수 있게 해주는게 Provider 이다
1 | import { Provider } from 'react-redux'; |
- App 컴포넌트는 모든 컴포넌트를 담고 있으므로 Provider로 App 컴포넌트를 감싸게 되면 모든 컴포넌트가 store에 접근 할 수 있게 된다
- 여기서 알 수 있는점은 App이 아니라 특정 컴포넌트만 Provider로 감싸면 그 컴포넌트만 store에 접근 할 수 있다는 점.
- Provider는 만들어 놓은 store를 필수적으로 props로 넘겨주어야 한다
Reducer에는
- createAction, createReducer, createSlice, createAsyncThunk… 등등 있다
- createAction : action 타입 정의, action 생성 함수
- createReducer : initialState 정의, reducer 함수
- toolkit에서 사용하는 createSlice에는 createAction 과 createReducer를 내부에서 사용할 수 있으므로 createSlice만 사용 해도 된다
1 | import { createSlice } from '@reduxjs/toolkit'; |
name
- creatAction에서 type에 해당하는 부분. action의 prefixer로 사용 된다
initialState
- state초기 값들을 설정할 수 있다 useState()의 초기값이라고 정리했다
reducers
state에 변화를 일으키는 함수들을 모아놓은 객체이다
함수의 매개변수로는 state = initialState, action = type 과 payload가 들어있다
- payload에는 이 action 함수를 호출할때 넘겨주는 인수가 들어 있다
- 객체구조분해를 통해 payload만 꺼내서 사용 할 수도 있다
action을 콘솔로 찍었을때
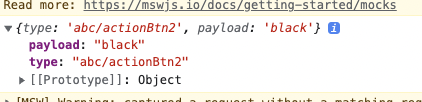
- action 은 객체 타입이고 안에 type 과 payload가 들어있다
- type은 name에서 지어준 이름이 prefixer로 붙어있고 action 함수 이름이 있다
- payload는 action 함수를 호출할때 넣어준 인수가 들어있다
action 함수는 하나의 값만이 아닌, 객체, 배열등도 넘길 수 있다
객체로 값을 넘겼을때 payload를 콘솔로 찍었을때

컴포넌트에서 store에 접근할때 사용하는 Hook
useSelector
- 컴포넌트에서 store안에 있는 state값에 접근하기 위해서는 useSelector 훅을 사용해야 한다
1
2
3
4
5
6
7
8
9
10import { useSelector } from 'react-redux';
export default function App() {
const green = useSelector((state) => state.colorBtn.green);
const red = useSelector((state) => state.colorBtn.red);keyword
return (
<div style={{ backgroundColor: green }}></div>
);
} - 값을 꺼내 컴포넌트의 초기값으로 사용할 수 있다
useDispatch
- 컴포넌트에서 store안에 있는 action함수를 호출 하기 위해서는 useDispatch 훅을 사용한다
- store 안에 있는 action 중 사용 할 것들을 import 해줘야 한다
- useDispatch()를 바로 사용 할 수 없으므로 변수에 담아 사용 한다 (바로 사용할 수 있는지 사실 잘 모르겠지만 에러가 뜬다)
- action 함수를 호출할때 인수로 변경할 값을 넘길 수 있다. 이때 값은 payload에 들어간다
1 | import { useDispatch } from 'react-redux'; |
강의 따라하기
1 | // Redux Toolkit은 Redux 코어 뿐 아니라 |
store.js 만들기
1 | // store.js |
index.js 에 provider 로 <App> 감싸기
Provider로 store를 넣어서 App을 감싸게 되면 렌더링하는 그 어떤 컴포넌트던지 리덕스 스토에 접근 할 수 있게 된다
1 | // index.js |
Reducer 만들기
슬라이스를 생성하려면 슬라이스를 식별하기 위한 문자열 이름 name:'counter',
초기 상태값 initialState:{0} 상태 업데이트 방법을 정의하는 하나 이상의 리듀서 함수가 필요하다
Redux는 데이터 복사본을 만들고 복사본을 업데이트하여 모든 상태 업데이틀 불변하게 작성하도록 요구한다
그러나 Redux 툴깃의 createSlice 및 createReducer API는 Immer 내부로직을 사용하여 불변데이터를 올바르게 업데이트 되게 해준다
- reducer 만들고 store에 등록해야 한다스토어에 등록
1
2
3
4
5
6
7
8
9
10
11
12
13
14
15
16
17
18
19
20
21
22
23
24// counterSlice.js
import {createSlice} from '@reduxjs/toolkit'
export const counterSlice = createSlice({
name:'counter',
initialState:{
value:0
},
reducers:{
increment:(state) => {
state.value += 1;
},
decrement:(state) => {
state.value -= 1;
},
incrementByAmount:(state,action) => {
state.value += action.payload
}
}
})
export const { increment, decrement, incrementByAmount } = counterSlice.actions;
export default counterSlice.reducer1
2
3
4
5
6
7
8// store.js
import { configureStore } from '@reduxjs/toolkit';
import counterSlice from '../features/counter/counterSlice';
export default configureStore({
reducer: {
counterSlice,
},
});
컴포넌트 만들기
useSelector를 사용해서 저장소에서 데이터를 읽고 useDispatch를 사용해 작업을 전달 할 수 있다
1 | import React from 'react'; |