ㅇㅇㅈ Blog

프론트엔드 수행중

0%

next js 중첩 레이아웃

프로젝트를 하던중 탭을 이용해 페이지 내에서 페이지를 전환?해야 할게 생겼다.
React에서는 react-router-dom의 outlet을 이용해 쉽게 만들 수 있었는데
next에서는 어떤식으로 만드는지 궁금해졌다.

next 공식 문서를 먼저 찾아본다..

넥스트 공식문서

If you need multiple layouts, you can add a property getLayout to your page, allowing you to return a React component for the layout. This allows you to define the layout on a per-page basis. Since we’re returning a function, we can have complex nested layouts if desired.

여러 레이아웃이 필요한 경우, 페이지에 getLayout 속성을 추가하여 레이아웃에 대한 React 컴포넌트를 반환할 수 있습니다. 이를 통해 페이지 단위로 레이아웃을 정의할 수 있습니다. 함수를 반환하기 때문에 원하는 경우 복잡한 중첩 레이아웃을 가질 수 있습니다.

1
2
3
4
5
6
7
8
9
10
11
12
13
14
15
16
17
18
import type { ReactElement } from 'react'
import Layout from '../components/layout'
import NestedLayout from '../components/nested-layout'
import type { NextPageWithLayout } from './_app'

const Page: NextPageWithLayout = () => {
return <p>hello world</p>
}

Page.getLayout = function getLayout(page: ReactElement) {
return (
<Layout>
<NestedLayout>{page}</NestedLayout>
</Layout>
)
}

export default Page
1
2
3
4
5
6
7
8
9
10
11
12
13
14
15
16
17
18
import type { ReactElement, ReactNode } from 'react'
import type { NextPage } from 'next'
import type { AppProps } from 'next/app'

export type NextPageWithLayout<P = {}, IP = P> = NextPage<P, IP> & {
getLayout?: (page: ReactElement) => ReactNode
}

type AppPropsWithLayout = AppProps & {
Component: NextPageWithLayout
}

export default function MyApp({ Component, pageProps }: AppPropsWithLayout) {
// Use the layout defined at the page level, if available
const getLayout = Component.getLayout ?? ((page) => page)

return getLayout(<Component {...pageProps} />)
}

역시 공식문서는 봐도 어렵다

그냥 똑같이 만들어 본다.

일단 파일은 이렇게 만들었다.

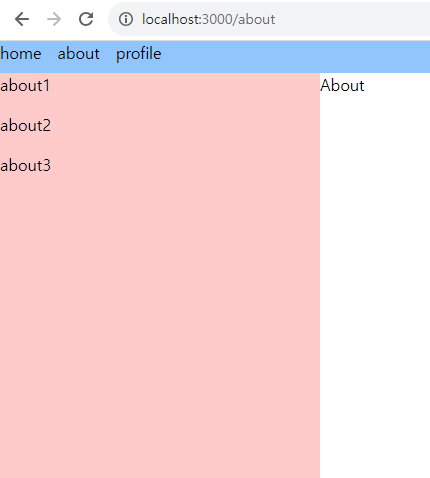
Header를 담고 있는 전체 Layout, 특정 페이지에만 적용될 NestedLayout

1
2
3
4
5
6
7
8
9
10
11
12
13
14
15
16
import React from 'react'
import Header from './Header'
interface LayoutProps {
children: React.ReactNode
}
const Layout = ({ children }: LayoutProps) => {
return (
<div>
<Header />
{children}
</div>
)
}

export default Layout

레이아웃 컴포넌트를 만들고

1
2
3
4
5
6
7
8
9
10
11
12
13
14
15
16
import '@/styles/globals.css'
import type { AppProps } from 'next/app'
import Layout from '@/components/Layout'
import { NextPage } from 'next'

export type NextPageWithLayout<P = {}, IP = P> = NextPage<P, IP> & {
getLayout?: (page: React.ReactElement) => React.ReactNode
}
type AppPropsWithLayout = AppProps & {
Component: NextPageWithLayout
}

export default function App({ Component, pageProps }: AppPropsWithLayout) {
const getLayout = Component.getLayout || (page => page)
return <Layout>{getLayout(<Component {...pageProps} />)}</Layout>
}

페이지 컴포넌트 내에 getLayout 메서드가 있으면 그것을 사용하고, 없으면 입력으로 받은 페이지를 그대로 반환한다.
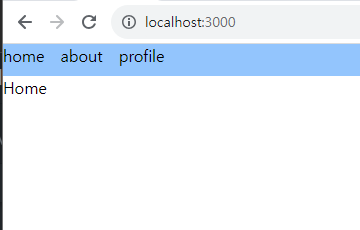
헤더가 적용된 layout

about 페이지에는 SideNav를 넣어 /about/1, /about/2 이런식으로 라우팅을 할 것이다.

1
2
3
4
5
6
7
8
9
10
11
12
13
14
15
16
import React from 'react'
import SideNav from './SideNav'
interface NestedLayoutProps {
children: React.ReactNode
}
const NestedLayout = ({ children }: NestedLayoutProps) => {
return (
<div className="flex">
<SideNav />
{children}
</div>
)
}

export default NestedLayout

NestedLayout을 정의하고

1
2
3
4
5
6
7
8
9
10
11
12
import React from 'react'
import type { NextPageWithLayout } from '../_app'
import NestedLayout from '@/components/NestedLayout'

const About: NextPageWithLayout = () => {
return <div>About</div>
}
About.getLayout = function getLayout(page: React.ReactElement) {
return <NestedLayout>{page}</NestedLayout>
}
export default About

About페이지를 NestedLayout으로 감싸준다.
getLayout 메소드가 있으므로 _app에서 Component.getLayout이 Return된다.

Read more »

모달창을 onClick으로 닫을 시..

프로젝트를 하다가 모달창을 띄워 input에 텍스트를 입력하는 컴포넌트를 만들었다.
백그라운드를 클릭하면 모달창이 닫히게 했는데
input의 입력값을 다시 쓰기 위해 드래그 하다 마우스 포인터가 모달 밖으로 이동하여 백그라운드까지 넘어가버리면 모달창이 닫혀버리는 아주 불쾌한 경험이 생겼다..

1
2
3
4
5
6
7
8
9
10
11
12
13
14
15
16
17
18
19
20
21
22
23
24
25
26
27
28
29
30
31
32
33
34
35
36
37
38
39
40
41
42
43
44
45
46
47
48
49
50
51
52
53
54
55
56
57
58
59
60
61
62
63
64
interface ModalProps {
setOpenModal: React.Dispatch<React.SetStateAction<boolean>>
}
const Modal = ({ setOpenModal }: ModalProps) => {
const handleCloseModal = (e: MouseEvent<HTMLDivElement>) => {
const target = e.target as HTMLDivElement
if (target.id === 'modal-bg') {
setOpenModal(false)
}
}
return (
<div
id="modal-bg"
style={{
backgroundColor: 'rgba(75, 75, 75, 0.773)',
width: '100vw',
height: '100vh',
position: 'absolute',
top: 0,
left: 0,
display: 'flex',
alignItems: 'center',
justifyContent: 'center',
}}
onClick={handleCloseModal}
>
<div
style={{
backgroundColor: '#fff',
width: '20%',
height: '50%',
display: 'flex',
alignItems: 'center',
justifyContent: 'center',
}}
>
<input type="text" />
</div>
</div>
)
}
export default function Home() {
const [openModal, setOpenModal] = useState(false)

const handleOpenModal = () => {
setOpenModal(true)
}
return (
<>
<Head>
<title>Create Next App</title>
<meta name="description" content="Generated by create next app" />
<meta name="viewport" content="width=device-width, initial-scale=1" />
<link rel="icon" href="/favicon.ico" />
</Head>
<main style={{ position: 'relative' }}>
<div>
<button onClick={handleOpenModal}>open modal</button>
</div>
{openModal && <Modal setOpenModal={setOpenModal} />}
</main>
</>
)
}

그리하여 이것을 해결하고자 gpt에게 물어본 결과.. onMouseDown과 onMouseUp이었다.

modal쪽에 mouseIsDownOnModal state와 onMouseUp을 실행하는 함수를 더 생성해야 했다.

1
2
3
4
5
6
7
8
9
10
11
12
13
14
15
16
17
18
19
20
21
22
23
24
25
26
27
28
29
30
31
32
33
34
35
36
37
38
39
40
41
42
43
44
45
46
47
const Modal = ({ setOpenModal }: ModalProps) => {
const [mouseIsDownOnModal, setMouseIsDownOnModal] = useState(false)
const handleMouseDown = (e: MouseEvent<HTMLDivElement>) => {
const target = e.target as HTMLDivElement
if (target.id !== 'modal-bg') {
setMouseIsDownOnModal(true)
}
}
const handleMouseUpAndModalClose = (e: MouseEvent<HTMLDivElement>) => {
const target = e.target as HTMLDivElement
if (target.id === 'modal-bg' && !mouseIsDownOnModal) {
setOpenModal(false)
}
setMouseIsDownOnModal(false)
}
return (
<div
id="modal-bg"
style={{
backgroundColor: 'rgba(75, 75, 75, 0.773)',
width: '100vw',
height: '100vh',
position: 'absolute',
top: 0,
left: 0,
display: 'flex',
alignItems: 'center',
justifyContent: 'center',
}}
onMouseDown={handleMouseDown}
onMouseUp={handleMouseUpAndModalClose}
>
<div
style={{
backgroundColor: '#fff',
width: '20%',
height: '50%',
display: 'flex',
alignItems: 'center',
justifyContent: 'center',
}}
>
<input type="text" />
</div>
</div>
)
}

handleMouseUpAndModalClose에서 mouseIsDownOnModalstate가 false일시 if문이 통과 되면서 modal이 닫히게 된다.
왜 false일때 닫히게 되는걸까 궁금해서
콘솔을 찍어 보았다.

첫 클릭은 모달창을 클릭, 두 번째 클릭은 bg를 클릭

mousedown일때 bg이외의 영역을 클릭시 mouseIsDownOnModal을 true로 만들어
mouseUp일때 if문을 통과 시키지 못하게 한다.
반대로 bg를 클릭할때는 mouseIsDownOnModal가 false이므로 if문을 통과해 모달을 닫는다..

Nextjs 중첩 라우팅

  • nextjs는 파일기반 라우팅이 된다
1
2
3
4
5
6
7
8
9
src
└─ pages
├─ index.tsx <- pages디렉토리의 index.tsx가 home이 된다
├─ clients
├─ index.tsx <- clients디렉토리의 index.tsx가 clients 주소가 된다
├─ [id] <- 동적라우팅을 위한 디렉토리
├─ index.tsx <- [id]의 페이지
├─ [client].tsx <- 동적라우팅을 위한 파일

구조가 복잡해 보이지만 적응되면 이해가 쉽다.

http://localhost:3000/clients/[id]/[client]의 주소가 된다
[id][client]는 동적으로 바뀌는 주소

1
2
3
4
5
6
7
8
9
10
11
12
13
// [id] 디렉토리내의 index.tsx

import { useRouter } from 'next/router'
import React from 'react'

const ClientProjectsPage = () => {
const router = useRouter()
return (
<div>
<h1>{router.query.id}</h1>
</div>
)
}

next에서 제공하는 라우팅 할 수 있는 hook useRouter
콘솔로 router를 찍어 보면

여러 정보가 들어있다.

1
2
3
4
5
6
7
8
9
10
11
12
13
14
15
// [id] 디렉토리 내의 index.tsx
import { useRouter } from 'next/router'
import React from 'react'

const ClientProjectsPage = () => {
const router = useRouter()
return (
<div>
{/* router.query.[디렉토리] */}
<h1>{router.query.id}</h1>
</div>
)
}

export default ClientProjectsPage
Read more »

NativeStackScreenProps와 NativeStackNavigationProp

1
2
3
4
5
6
7
8
9
10
11
12
13
14
15
16
export type ProfileButtonListType = {
iconName: string
buttonTxt: string
rightIcon: string
iconColor: keyof Colors
path?: keyof ProfileStackParamList
}
const profileButtonList: ProfileButtonListType[] = [
{ iconName: 'form', iconColor: 'success', buttonTxt: '나의 소모임', rightIcon: 'right', path: 'MyGroupScreen' },
{ iconName: 'user', iconColor: 'primary', buttonTxt: '프로필 수정', rightIcon: 'right', path: 'EditProfileScreen' },
{ iconName: 'logout', iconColor: 'warning', buttonTxt: '로그 아웃', rightIcon: 'right' },
]

{profileButtonList.map(button => (
<ProfileButton key={button.buttonTxt} buttonProps={button} />
))}

path를 props로 넘겨서 navigate한다.

1
2
3
4
5
6
7
8
9
10
11
12
13
14
15
16
17
18
19
20
21
22
23
interface ProfileButtonProps {
buttonProps: ProfileButtonListType
}

type ProfieScreenProp = NativeStackScreenProps<ProfileStackParamList>

const ProfileButton = ({ buttonProps }: ProfileButtonProps) => {
const navigation = useNavigation<ProfieScreenProp>()
return (
<CustomButton
variant="gray200"
fullWidth
height={80}
borderRadius={20}
flexDirection="row"
justifyContent="space-between"
mb={10}
onPress={() => buttonProps.path && navigation.navigate(buttonProps.path)}
>
...
</CustomButton>
)
}

이런 에러가 발생한다.. 그런데 또 동작은 된다 😞

console로 navigation을 찍어보니

navigate가 들어있다.. 도대체 뭐야?

이리저리 검색해보다가 NativeStackNavigationProp가 눈에 들어왔다.

이거다!

NativeStackScreenProps 와 NativeStackNavigationProp

  1. NativeStackScreenProps

NativeStackScreenProps는 스크린 컴포넌트의 props 타입을 정의하는 제네릭 타입입니다.
일반적으로 스크린 컴포넌트의 타입을 작성할 때 사용됩니다. React.FC와 같은 방식으로 사용할 수 있습니다.

1
2
3
4
5
6
7
8
9
type ProfileScreenProps = NativeStackScreenProps<ProfileStackParamList, 'ProfileScreen'>;

const ProfileScreen = ({ navigation }:ProfileScreenProps) => {
// 스크린 컴포넌트의 props에서 navigation을 사용할 수 있습니다.

return (
// 스크린 컴포넌트의 JSX 코드
);
};
  1. NativeStackNavigationProp은

NativeStackNavigationProp은 네비게이션 프로퍼티(navigation 객체)의 타입을 정의하는 제네릭 타입입니다.
일반적으로 useNavigation 훅 또는 withNavigation 고차 컴포넌트와 함께 사용됩니다.

1
2
3
4
5
6
7
8
9
type ProfileScreenNavigationProp = NativeStackNavigationProp<ProfileStackParamList, 'ProfileScreen'>;

const ProfileScreen = () => {
const navigation = useNavigation<ProfileScreenNavigationProp>();

return (
// JSX 코드
);
};

GPT가 차이점에 대해 설명해주었다.. 아하

NativeStackScreenProps은 props로 navigation을 이용하고 NativeStackNavigationProp은 useNavigation을 이용한다.

React-Native Navigation

사이드 플젝을 하면서 React-Native를 이용해 App을 만들기로 했다.
그냥 React랑 비슷하다기에 무작정 시작했는데 음.. 비슷하면서도 조금 많이 다르다 ㅎㅎ 😥

어쨌든 시작했으니 해보는 수밖에.. 일단 Routing이 다르기에 공식문서를 보며 공부해보자.

1
& npx react-native@latest init AwesomeProject

공식 문서 그대로 react-native 프로젝트를 생성해줬다.
사실 프로젝트를 만들기 전에 sdk랑 뭐뭐뭐 설치해야 했는데.. 그냥 공식 문서 보면서 순서대로 따라하다 보니 되었다.

1
2
3
$ npm install @react-navigation/native @react-navigation/native-stack

$ npm install react-native-screens react-native-safe-area-context

차례대로 설치 해주었다.

App.tsx

1
2
3
4
5
6
7
8
9
10
11
12
13
14
15
16
17
18
19
20
21
22
23
24
25
26
27
28
29
30
31
32
33
34
35
36
37
38
39
40
41
42
43
44
45
46
47
48
// import 해주고
import {createNativeStackNavigator} from '@react-navigation/native-stack';
import {NavigationContainer} from '@react-navigation/native';

// 생성해주고
const Stack = createNativeStackNavigator();

const App = () => {
return (
// BrowserRouter랑 비슷한 건가..?
<NavigationContainer>
{
//Routes 같고
<Stack.Navigator>
<Stack.Screen name="Home" component={HomeScreen} />
<Stack.Screen name="Profile" component={ProfileScreen} />
</Stack.Navigator>
}
</NavigationContainer>
)
}

import {NavigationProp, ParamListBase} from '@react-navigation/native';

interface HomeScreenProps {
navigation : NavigationProp<ParamListBase>
}
/**
* @param navigation:NavigationProp<ParamListBase>;
* NavigationProp은 해당 화면이나 컴포넌트에서 다른 화면으로의 네비게이션을 가능하게 해주는 속성과 메서드를 포함한 객체입니다.
* ParamListBase는 라우팅에 사용되는 스크린 이름과 해당 스크린에 전달되는 파라미터를 정의한 타입입니다.
* 일반적으로 ParamListBase는 라우팅 구성에서 정의한 ParamList 타입이 됩니다.
* NavigationProp 객체는 navigate, goBack, push, pop 등의 메서드를 포함하고 있어, 이를 통해 다른 화면으로 이동하거나 이전 화면으로 돌아갈 수 있습니다.
*/
const HomeScreen = ({navigation}:HomeScreenProps)=>{
return (
<View>
<Button
title="Go to Jans"
onPress={() => navigation.navigate('Profile')}
/>
</View>
);
}

const ProfileScreen = () => {
return <Text>This is's profile</Text>;
};

잘 된다~~

vitest 설치 후 설정하는 과정에서 예전에 했던대로 똑같이 했는데 에러가 발생했다.

왜 설정은 항상 힘들게 하는 것이야.. 😞

구글링 해서 나온 블로그에선

1
2
3
4
// 이 부분을
import { defineConfig } from 'vite'
// 이렇게 고치란다..
import { defineConfig } from 'vitest/config'

그런데 이렇게 하면 test부분 에러는 사라지지만 plugins에서 error가 발생하는데..

stackoverflow에서 찾은 내용으로 수정해보았다.

vitest.config.ts를 만들어서

1
2
3
4
5
6
7
8
9
10
import { defineConfig } from 'vitest/config'

export default defineConfig({
test: {
globals: true,
environment: 'jsdom',
setupFiles: './setup.ts',
},
})

이 부분만 작성 해주었더니 된다..


번외 error..

아니 왜 About이 제대로 렌더가 안되는 거냐고 😞

test파일 확장자를 About.test.ts로 만들었더니 jsx를 제대로 인식하지 못하는 것이었다……

About.test.tsx로 확장자를 바꿔줬더니 제대로 된다.. ㅣ
이건 그냥 react에서도 .ts로 하면 jsx문법을 사용 못해 같은 에러가 발생하는 거였는데
테스트파일이여서 다른 이유인줄 알고 한참을 헤맸다 😧

  • 빈 객체 확인
    1
    2
    3
    4
    5
    6
    7
    const checkObj = (obj)=>{
    console.log(obj.constructor === Object) // true
    console.log(obj.constructor === Array) // false
    console.log(Object.keys(obj).length) // 0
    console.log(!!Object.keys(obj).length) // false
    }
    checkObj({})

vscode error

강의를 듣는 도중 에러 알림이 계속 뜨길래 그냥 아무생각없이 뭔가를 비활성화 했더니
vscode가 auto import도 안되고 typescript를 인식(?) 하지 못하는 일이 발생했다.. 😥

a의 타입을 지정하지 않아도 에러가 뜨지 않았다..

구글링으로 검색해도 딱히 해결방법이 나오지 않았는데
bing ai챗으로 검색하니 바로 해결법이 딱..

vscode extension에서 @builtin typescript를 입력해서 나오는것을 사용으로 바꿔줘야 한다..

typecheck가 정상적으로 작동한다

Jest encountered an unexpected token

진행했던 TMDB-Movie 프로젝트에 배웠던 테스트코드를 작성해보았다.

Jest encountered an unexpected token란 error를 뿜으며 당황시키게 하는..

처음에는 typescript에서 jest사용에 설정 문제인줄 알고

해당 링크에 있는 문서들에서 설치하라는 모듈.. config을 다 작성해보았는데 해결이 되지 않았다.

근데 의문점이 프로젝트를 처음부터 CRA, typescript template으로 구성했는데 설정에러가 난다는게 의심스러웠다.

그래서 details를 보니 mui 라이브러리 import하는 부분에서 에러가나는게 의심스러워 mui keyword를 붙여서 error case 구글링을 하기 시작했다.

MUI 문서

번들링 사이즈를 줄여본다고 mui import를 Level 3까지 내려가서 불러온게 문제였다.

1
2
3
4
5
6
7
8
9
10
11
12
13
// ✅ OK
import { Add as AddIcon } from '@mui/icons-material';
import { Tabs } from '@mui/material';
// ^^^^^^^^ 1st or top-level

// ✅ OK
import AddIcon from '@mui/icons-material/Add';
import Tabs from '@mui/material/Tabs';
// ^^^^ 2nd level

// ❌ NOT OK
import TabIndicator from '@mui/material/Tabs/TabIndicator';
//

해당 파일에서 import 부분을 수정하고 나서 다시 test를 돌려보니

Jest encountered an unexpected token error는 해결된 것 같았지만 다른 에러가 발생..

뭔가 에러가 시뻘겋게 엄청 많이떠서 당황했지만 의외로 간단한 문제였다

<BrowserRouter>를 import 해주고 rendering할 컴포넌트를 감싸주기만 하면 됐다.

👉 참고

1
2
3
4
5
6
7
8
9
10
11
12
13
14
import { render, screen } from '@testing-library/react';
import WhatsPopular from '../popular/WhatsPopular';
import { BrowserRouter } from 'react-router-dom';
test('rendering whatsPopular text', () => {
render(
<BrowserRouter>
<WhatsPopular />
</BrowserRouter>
);

const whatsPopular = screen.getByText(/WhatsPopular/i);

expect(whatsPopular).toBeEnabled();
});

test 통과 🤣

그리고 처음 에러를 해결해보려 설치했던 모듈들을 하나씩 지워가면서 테스트 해보았다.
결론은 설치할 필요 없었음. 😞